Posts

Showing posts from June, 2013

Tips for ListView: View recycling, use the ViewHolder....
Image
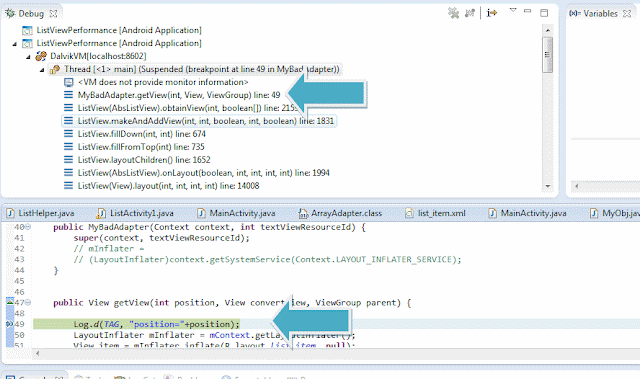
All android devs use extensively ListView in their apps. I think many of us, also myself of course, have written at least once a very bad Adapter. I think that the first time there was talked about performance and optimization of listview, was at I/O 2009. You can find this document . At Google IO 2010,the subject was taken up again. Here you can find the document . There are 2 key points: View recycling View Holder pattern I would say that many of Android examples that I see do the first item properly. It's pretty simple, use the convertView on simple adapters like ArrayAdapter or use the newView on more involved adapters like CursorAdapter . But I must say that the ViewHolder pattern is not so common . It is very important to understand what it is, and why we should use view recycicling and ViewHolder pattern. Let's take a small example. It is a BAD ADAPTER . You should never do it!! /** * Bad Adapter. * * DON'T USE IT !!!!! * */ public class

SlidingPaneLayout implementing swipe to remove items in list and undo action.

Image
In my previous post I described how to work with the new SlidingPaneLayout . Some readers asked me how to remove items from list with swipe gesture like in Google Hangouts or Gmail. It is not very simple .... but I realized something like this. As always it is just an example,do not take this code too seriously . First of all, we have to integrate list with a SwipeListener. There is a beatiful example in dashclock by Roman Nurik ...so why not, we can use it. You can find it here: SwipeDismissListViewTouchListener . Pay attention: In source you can find: // THIS IS A BETA! I DON'T RECOMMEND USING IT IN PRODUCTION CODE JUST YET.... We'll run the risk ... Dashclock is in Google Play, and I think that it will be maintained for a long time. Now we can integrate our MyListFragment with this Listener. It is very simple. @Override public void onActivityCreated(Bundle savedInstanceState) { super.onActivityCreated(savedInstanceState); // We use a arrayLis

Quick Tips: Convert to new Gradle-based build system a project with ActionBarSherlock

Image
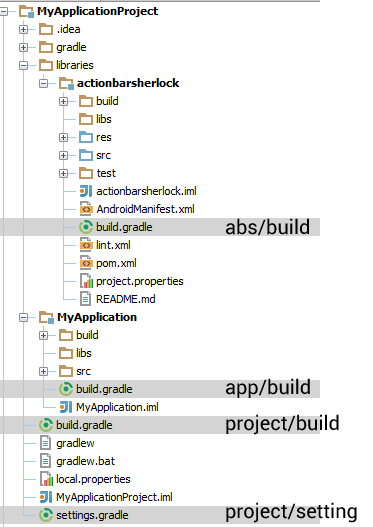
I imagine that these days many devs are trying to migrate to the New Build System based on Gradle . Many "big" open-source projects are still in migration...it still takes a bit of time. Looking in the forums, everyone was having the same problems...and that consoles me, I am not alone. Gradle is awesome,but there are many tips to learn, and one of the main pitfalls is that it is not yet able to deal with the most common dependency format for library projects: the maven apklib. Hence the first problem that I have come across. How to work with actionbarsherlock. This is a quick tips to use abs with Gradle and AndroidStudio 0.1.3 . The procedure will work for many other library projects. Create a new project "MyApplicationProject", with a module MyApplication with the standard wizard. Now you can create a folder "libraries" (the name is not important) and copy ActionBarSherlock source into (or clone from github). To avoid problems with the su

The importance of a good concept, sketches and mockups

Image
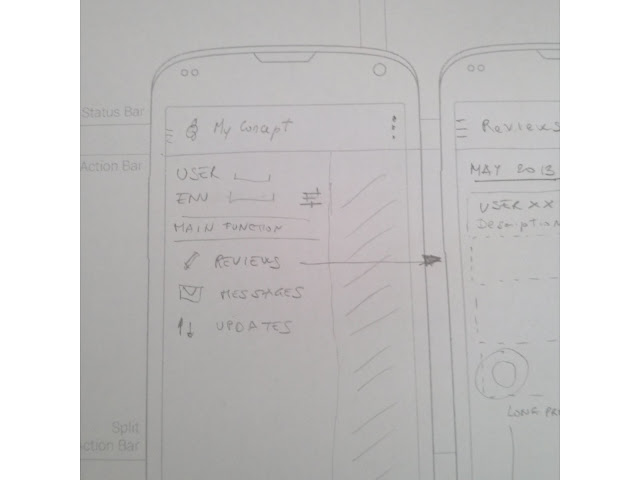
The assumption is that I am not a designer, or at least I don't consider myself such. Very often when we start a new project, we immediately start writing code, or we have the strong temptation to do so. I don't think that it is a good approach . You can realize that the first time you get to work with some mock-ups.It is another world. It is a aweosome world. If you can't work with a designer, you should look for a good designer. As last choise, you can still do something alone. It is not easy, it can't be easy, there are people who do it as a job. I'am not able to teach anything about this field, but it is essential to know how to look at the sketches, or at least how to use a bit some tools. If you want to make sketches, just a pencil and paper .....certainly need to know how to draw ... I find so amazing the material that has released for free by Taylor Ling. You can find here printable-a4-gui-sketching Ok, download it, print it , take a pencil a

Navigation Drawer with counter

Image
In my previous post I described how to create a Navigation Drawer. Some readers asked me how to integrate the menu with a counter, just as it appears in the official documentation . Something like this... I think we can achieve it in many ways. Let's start with row layout. For each row we use a RelativeLayout with a ImageView which is icon, a TextView which is the title and an other TextView which is the counter. Our counter is a simple TextView . We use android:layout_alignParentRight="true" to align it on the right. It is very important this line: android:background="@drawable/rectangle" . We use a rectangular shape with rounded corners to draw the counter's background. Here you can find rectangle.xml: Now we need to adjust our Model and Adapter: public class NsMenuItemModel { public int title; public int iconRes; publ